Building An Above Ground Pool Deck- Step By Step
Looking into building an above ground pool deck for your backyard? Now is the time to start planning your deck, with summer right around the corner!
Whether you’re looking to build a small platform or take on a huge project like ours, these steps will help guide you with your above ground pool deck build.
Last summer, we installed an above ground pool and deck in our back yard. Both the pool and the deck have already gotten SO much use! In this post, we will share our experience of building our above ground pool deck.

Building An Above Ground Pool Deck
Above ground pools are a really cost-effective way to go when you want to add a pool to your backyard but don’t want to shell out the money for an in-ground pool. However, they can really detract from the natural beauty of your backyard.
Why Add a Pool Deck?
Building an above ground pool deck around the pool structure can bring everything up a notch when it comes to functionality, aesthetics, and overall enjoyment.
We’ve installed a few above ground pools, but we’ve never added a deck before. We’ve been giving our backyard a makeover this past year, and decided a pool deck was a must-have to complete our vision.
Above Ground Pool Deck Materials

After some research, we decided to go with a composite material rather than wood, for the durability and the aesthetic.
For more of a breakdown on the best materials for an above ground deck, read our post here.
We researched the benefits of both building a wooden deck, and one made with composite materials. In a previous house, we had a huge wood deck, and personally know the upkeep that comes with using that type of material. We wanted a material that would last for years and years without any worry over rot or wear.
As a result, we decided to use composite materials, and found the color we liked best from Deckorators, sold at Lowes.
Building An Above Ground Pool Deck: Step By Step
Materials Needed
- String
- Stakes
- Chalkline
- Composite Decking Boards
- Lumber
- Bags of Concrete
- Metal Brackets and Hardware
- Fasteners
- Aluminum Railing System
- Post Camps and Trim
- Decking screws
- Drill Bits
- Caulk
- Gravel and/or Stone Footings
- Safety Equipment (hearing protection, safety glasses, gloves)
Tools Needed
- Measuring tape
- Drill
- Circular Saw
- Miter Saw
- Hammer
- Square
- Levels
- Camo Marksmen Pro-X1 Tool
- Speed Square
- Screwdrivers
- Socket and sockets sets
- Caulking Gun
- Pliers
- Sledge Hammer
- Laser Level
- Skilsaw
- Sawzall
Step 1: Planning
Before we started our pool deck construction process, we leveled the ground and set up our Intex Rectangular Pool. We measured the pool area to ensure we would have enough room to fit the deck between the side of the pool and the patio, as well as the back of our house.
Once the swimming pool was in place, we turned our focus to the pool deck. We obtained a few quotes from professional deck builders, but the cost exceeded our budget by a significant amount. One quote we received for a much smaller deck, using all wood material, was over $20,000– way over our budget!
With the size we wanted, we were better off building it ourselves. We broke down the cost of our DIY Above Ground Pool Deck in a post which you can read all about here.
It should be noted that when I (Meredith) say “us,” or “ourselves,” I really mean Daniel. I helped, but it was very minimal and I mostly contributed by complaining about how hot it was outside.
We also consulted with our local building department to determine if we needed a building permit for a project of this size. We did not. However, its always a good idea to check with your county/city codes before getting started on any project.
Step 2: Designing
To start our pool deck project, we first determined the dimensions we wanted for the deck. We opted not to build a small pool deck, because we wanted open space for a seating area, as well as room for our hot tub.
We scoured the internet and Pinterest for above-ground pool deck ideas, but ultimately we didn’t find anything that exactly fit our vision- so we decided to design it ourselves.
There are several free deck builder programs online, like Decks.com and Simpson Strong-Tie Deck Planner. We personally liked the Simpson Strong-Tie planner best, as it was the most comprehensive and easy to use.

Tip: Order Materials Early
After we completed the deck design online, we used another free deck builder program on Lowe’s website, which then gave us a complete list of materials and hardware needed for the project. This allowed us to plan and prepare efficiently. We ordered the deck boards and materials needed right off their website.
In some cases, materials may take several weeks to deliver. Its a good idea to get them on order sooner rather than later so your project isn’t delayed!

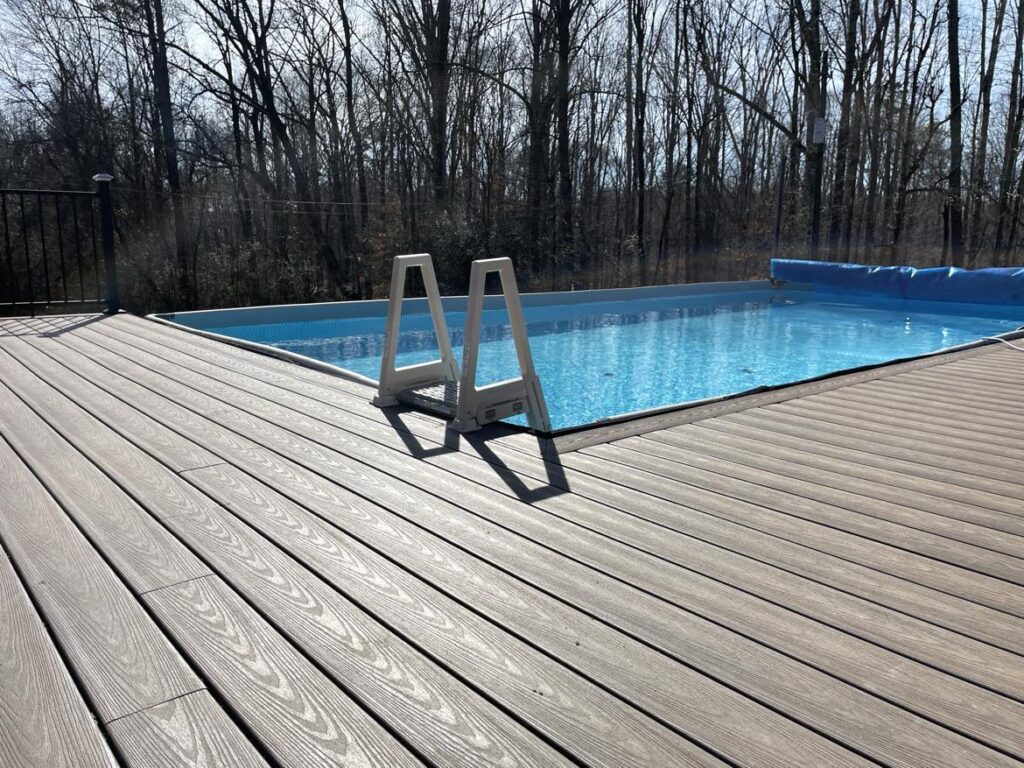
Our deck design follows an L-shaped, and extends along two sides of the pool. The outside dimensions are 26′-6″ and 24′-6″, while width of one leg of the deck is 10′-2″ and the other is 8′, making the total square foot of our deck about 380 sq ft.
Remember when taking into account the size of your deck to think about what you are going to be using it for. Also, how you are going to get the most enjoyment out of it? It’s a lot easer to build a larger deck the first time rather than adding on to it in the future.
Of course, a larger deck costs more and takes more time to build. We personally wanted a deck that would give us and our young children the most enjoyment for many years to come.
Step 3: Marking the Perimeter
Using stakes and string, we carefully marked off the perimeter of the deck. This common technique helped us visualize the layout and ensure accurate measurements.
Step 4: Foundation Preparation
We created a template to determine the size of the holes needed for the foundation posts. By spray painting around the template, we marked the precise locations for the holes. Daniel dug each hole by hand to a consistent depth of approximately 16 inches.

Step 5: Installing Foundation Posts
Once all the holes were dug, we repositioned the string line to be centered over the holes. We mixed concrete by hand and poured it into each hole. In total, we mixed and poured 7000 lbs of concrete into the post holes.

We then centered a concrete J bolt into the concrete, and aligned it with the string line. This ensured that all the foundation posts were even and in line. After the concrete hardened, we installed a 6×6 Simpson post bracket on top of each J-bolt, using a nut and washer.
Step 6: Cutting and Installing Posts
Daniel used 6×6 treated lumber posts, and cut them slightly longer than the final desired length. To determine the correct height, we used a laser level in the dark, aligning each post with the desired deck height. We leveled the posts, then notched them, to hold the deck joists securely in place.

Step 7: Installing Joists
We installed the deck joists, ensuring they were square, evenly spaced and positioned at the desired pool height taking into account the thickness of the decking.
With the joists, rim joists and supports installed, we installed diagonal braces to hold the deck from swaying side to side. The type of decking material you use will determine the minimum joists spacing. We used 14.5 inches on center, which is slightly more conservative than the manufacturer recommended.

The reason Daniel went with a slightly smaller joists spacing than recommended is because he didn’t want to feel the deck flexing when its walked on (which can happen with composite decking, especially during hot summer days.)
Once the joists were in place, we applied deck joists tape to the top of all the joists to prevent future rot and decay. To be honest, we started with official Butyl Joist Tape for the boards closest to the pool (which would receive the most splashing), but switched to Gorilla Tape to save money (and it is a lot easier to work with).

Step 8: Installing Composite Decking
Next, we installed the perimeter boards on top of the rim joist/rim board. There are a couple different reasons we decided to use perimeter boards:
First, we like the way the design looks. It gives a nice completed, trimmed look to the overall deck. Also, they do a great job of covering the butt ends of the other decking boards.
You will want to cover up the cut end/butt end of the majority of your deck boards since they are not aesthetically pleasing. This is the case no matter what type of composite decking you use, and is one disadvantage of using this type of material.
Here’s an example of what we mean by the cut/butt end of the deck boards:

The perimeter boards do not have a groove on either side, so hidden deck clips cannot be used and will require a couple different types of deck screws. We used the type of deck screw which requires a plug to be installed in the hole afterwards.

We also used camo edge deck screws, which require this special tool, and go in at steep angle on the edge of the board. Finally, we installed the rest of the composite decking on top, creating a durable and visually appealing surface. This step went a lot faster than the perimeter board!
Daniel used a circular saw to cut all these deck boards. A special blade is not required, as long as it is sharp. For best results, and a smoother cut, use a blade that is carbide tipped- with a high tooth count. These are typically used for finishing work.

He also had to add many small supports either on the ends or the edge of the decking board to support the decking boards, so we had something to screw into.
Timesaving Techniques For Building An Above Ground Pool Deck
1. Have someone help you slide the deck clips down in-between the boards as you push the boards together.
2. Get the right tools if you can- its not always worth saving money fighting something that would be a lot easier with the correct tool. Chances are, if you’re handy enough to build your own above ground pool and deck, you’re handy enough to use those tools on plenty of other projects in the future!
Step 9: Adding Pool Padding
When we were designing our deck, we wanted the deck to be flush with the edge of the pool. We were not able to find any online design or pictures showing this.
We had a couple design ideas and the best one we came up with was to install a thick pad to the inside edges of the of the frame to protect the pool and provide a comfortable surface, preventing the pool from pressing against the hard deck and wearing out over time.

Daniel found a 1.25” thick foam camping sleeping pad off of Amazon, and cut it into strips. We installed this pad using an adhesive and roofing nails- since they have a large head to help hold the pad in place. This worked great!
Step 10: Railings
We then installed black aluminum railings to enhance safety and give the deck a finished look. All of the railing material is the same brand as the deck boards, Deckorators. We used pre-assembled panels, which come with brackets and a top and bottom rail.
All the posts for this brand need to be purchased separately from the handrails. We purchased these at Lowes.

Tip: Aluminum railings can be cut with a standard carbide tip blade with a miter saw.

Step 11: Fabricating Stair Stringers and Installing Steps
The final construction step was building the stairs. We fabricated stair stringers ourselves. You can purchase precut stair stringers, but they only come at certain heights, none of which worked for the height of our deck.
Once the stringers were in place, we installed the steps using the same decking boards.

We will be adding fronts to the steps, as well as railings and posts.
We opted for a secure gate, to keep small children from getting into the pool, and added a lock as an additional safety feature. Additionally, we installed solar lights on the top of the posts, and some outdoor string lights for added lighting.


Now, Its On To Enjoying Our Above Ground Pool and Deck!
This project was one of the most difficult tasks we’ve taken on, but ultimately it was so worth it!
Building an above ground pool deck is a rewarding DIY project that can transform your pool area into a functional and inviting space! By carefully planning the dimensions, marking the perimeter, preparing the foundation, and installing the necessary components, you can create a custom deck that complements your pool and enhances your outdoor living experience.
Remember to prioritize safety, follow building codes, and consult with professionals if needed. Enjoy the satisfaction of a job well done as you relax and entertain on your beautiful new deck!


Nice blog right here! Additionally your website rather a lot up
very fast! What web host are you the use of? Can I get your associate hyperlink on your host?
I desire my website loaded up as quickly as yours lol