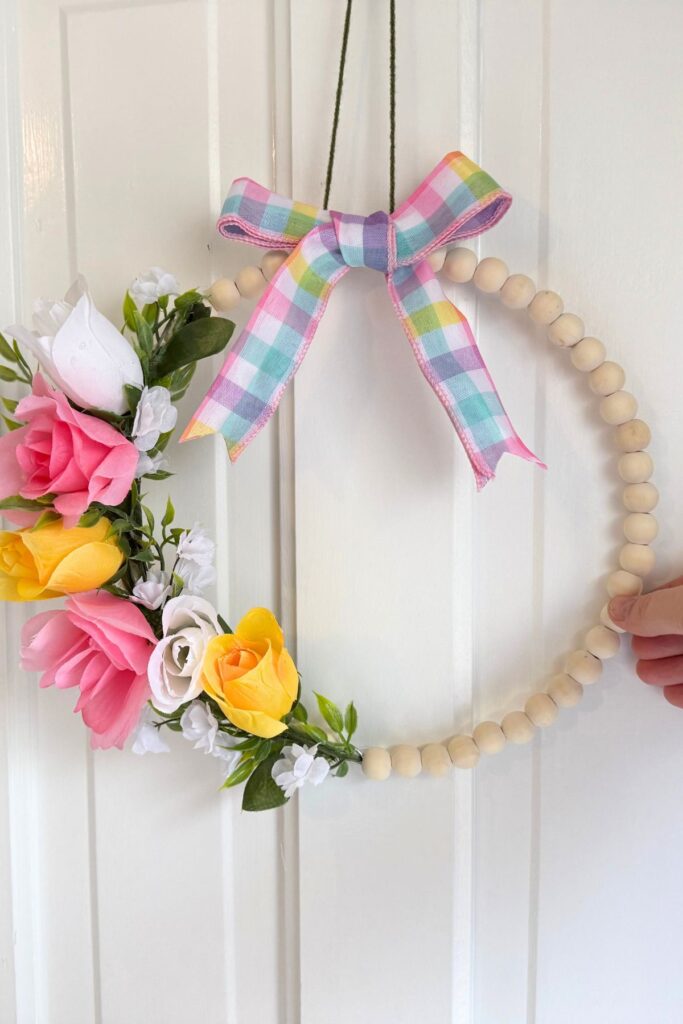
Easy Dollar Tree Spring Wreath Craft

If you love simple, affordable DIY decor that looks more expensive than it is, this Dollar Tree spring wreath is going to be right up your alley.
This project takes about 20 minutes, uses mostly Dollar Tree supplies, and works beautifully for spring, Easter, or everyday farmhouse decor.
Spring Wreath Craft
This spring wreath is lightweight and one of those crafts that looks is low-pressure, doesn’t require a ton of skill, and is just plain fun to make.
Even better? The wood bead wreath comes pre-made, so there’s no threading beads or complicated prep involved.
Why I Love This DIY
- Beginner friendly
- Budget-friendly (around $5–$7 total)
- Easy to customize for any season
- Perfect for doors, walls, or shelves
- Uses items you can actually find at Dollar Tree
Supplies You’ll Need

(Most- if not all! you can find at the Dollar Tree)
- Wood bead wreath (pre-strung)
- Faux flowers (roses, tulips, or mixed florals)
- Faux greenery stems
- Ribbon (gingham, linen, or satin work great)
- Hot glue gun & glue sticks
- Scissors or wire cutters
Step-by-Step Instructions
1. Decide on Your Design
Lay the wood bead wreath flat and decide where you want your florals.
For this design:
- Florals and greenery go on one side (I love the left side look)
- The rest of the wreath stays simple to show off the beads
This asymmetrical style keeps it modern and farmhouse-friendly.
2. Prep Your Florals & Greenery

- Cut flower heads from stems, leaving about 2-3 inches of stem so that you can wrap the stems around the wire between the beads for extra stability
- Cut greenery into smaller sprigs so they’re easy to layer
Keep everything loose until you’re happy with placement.
3. Attach the Greenery First

Starting on the side of the wreath:
- Hot glue greenery to the wire and the beads
- Angle greenery outward to follow the curve of the wreath
- Overlap pieces slightly to create fullness
This creates a natural base for your flowers and helps everything sit flat.
4. Add the Flowers

Now for the fun part:
- Place your largest flowers first near the center of the greenery
- Add medium flowers around them
- Fill in gaps with smaller blooms or filler florals
Tuck stems between beads and greenery so the mechanics stay hidden.
5. Secure Everything
Once you’re happy with the arrangement:
- Add extra glue behind stems
- Press firmly and allow glue to set
- Trim any visible plastic or wire ends
Flip the wreath over and remove any glue strings.
6. Make & Attach the Bow

Create a simple ribbon bow:
- I love gingham or floral plaid for spring, but neutral ribbon works year-round
- Glue the bow to the top center of the wreath
7. Hanging Your Wreath
Most Dollar Tree bead wreaths hang easily on their own, but you can:
- Tie ribbon, yarn or twine through the top bead
- Or glue a loop behind the bow for hidden hanging
Perfect for doors, walls, or hooks.

Spring Wreath Styling Ideas
- Spring: Pink, yellow, and white florals + gingham ribbon
- Easter: Pastels with soft greenery
- Farmhouse: White flowers + eucalyptus + linen ribbon
- Everyday: Greenery only with a neutral bow
Swap florals seasonally and reuse the same wreath base all year long.
Final Thoughts For A DIY Spring Wreath
This beaded floral hoop is one of those simple Dollar Tree DIYs that always gets compliments. It’s proof that you don’t need expensive supplies to create beautiful, welcoming decor for your home.
If you’re decorating on a budget or just want something quick and satisfying to make, this is a great one to try.
You May Also Like
12 Favorite Spring Decor Ideas to Cheer Up Your Home
Valentine’s Day Crafts & DIY Round-Up
Pin This For Later