DIY Camper Roof Replacement {Decking + Membrane}

We completed our camper roof replacement a few months ago, but I honestly haven’t had the will to blog about it until now. It was… the opposite of fun.
This post may contain affiliate links. See our affiliate disclosure here.
Both Daniel and I watched many YouTube videos prior to this great adventure that promised it “really wasn’t that difficult” and “it’s a little tedious but definitely a possible DIY job.”
It was technically a DIY job but it was something we wouldn’t recommend unless you’re a seasoned DIYer!
Replacing Our Camper Roof (AKA: A DIY Project We Never Want to Do Again)
However, the months have dulled the trauma, so I’m ready to recap this camper project with you.
I’m sure a big part of why this was such an awful job is that we live in the South, and the camper roof was hot in a way that felt personal. But I think it wouldn’t be fun in any weather.
Why We Had to Replace the Roof (Spoiler: Rot)
For clarity, our camper used an EPDM roofing membrane, and we replaced it with a PVC RecPro roofing membrane, which is often referred to as plastic roofing.
This wasn’t just a “refresh the membrane” situation. We discovered major rot in our camper roof — the kind you don’t really understand until you’re walking on the roof and your foot sinks. Massive soft spots everywhere.

That’s when we knew we weren’t just replacing the roofing material, but also a large portion of the roof decking and wood structure underneath.
We also decided that if we were already ripping everything apart, it made sense to do it right. That meant:
- Replacing damaged roof decking and wood supports
- Adding/replacing insulation
- Installing brand new vents
- Installing a new skylight
- Basically rebuilding the roof from the inside out (no big deal…)
If you’re curious about how deep this camper remodel rabbit hole goes, you can also check out:
- Our slide-out floor replacement
- What to know before buying a used camper (yeah, hindsight is 20/20)
And as a side note, I did get a quote from a professional to repair the roof, and it was between $9k-$10k. That was, uh, not in the budget. So DIY was our only option, but, he did give us some great tips for free, which we used and are passing on here.
Timeline on the Camper Roof Replacement
This project took us several weeks to complete, but only because we were delayed waiting for the roofing material (more on that later) and also because we took a (longer than needed but also much needed) break to let the glue cure on the new membrane.
Technically the glue is supposed to cure for about 48 hours, so there will always be a few day break in the process.
Overall, we estimate we worked on the actual roof for about 6 days.
Step One: Remove ALL the Caulk Around… Everything
Every seam. Every vent. Every trim piece. Every corner.


This was unbelievably time-consuming and soul-crushing. There is no shortcut. You just scrape… and scrape… and scrape.
We had help from our eldest on this one, which was great- this project really became a family affair.
Step Two: Remove Vents, AC Unit, and Trim Pieces
Once the caulk was gone, we removed all of the screws (some were so rusted they had to be sawed off) and then we removed all roof components:
- Vents
- Skylight and vent above stove
- The AC unit (which is as fun and heavy as it sounds)
- All trim pieces around the perimeter
Also extremely time-consuming.


We removed the AC unit by attaching a strap to it and slowly lowering it to the ground. It was heavy enough that Daniel couldn’t take it down the ladder.
Surprisingly, it didn’t scrape up the side of the camper.

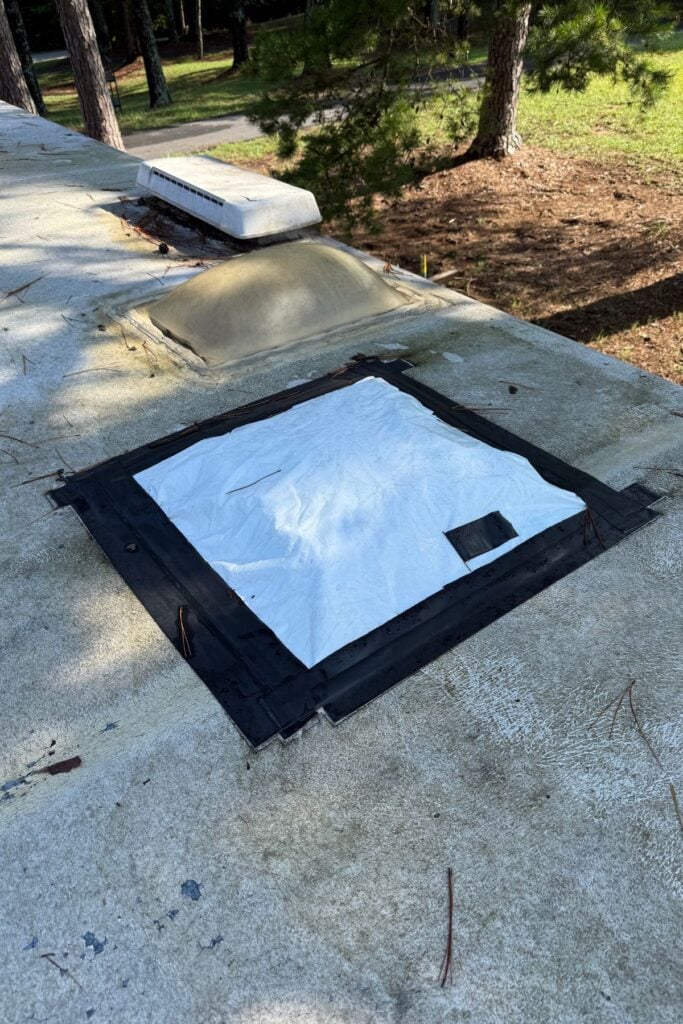
Step Three: Remove the Plastic Roofing
Thankfully, this part went faster than expected. Once everything was disconnected, the old roofing membrane came off relatively quickly — revealing all the damage underneath.


We were expecting the membrane to come off in little pieces, but we were able to peel it up off the decking in one piece.
So, yay.

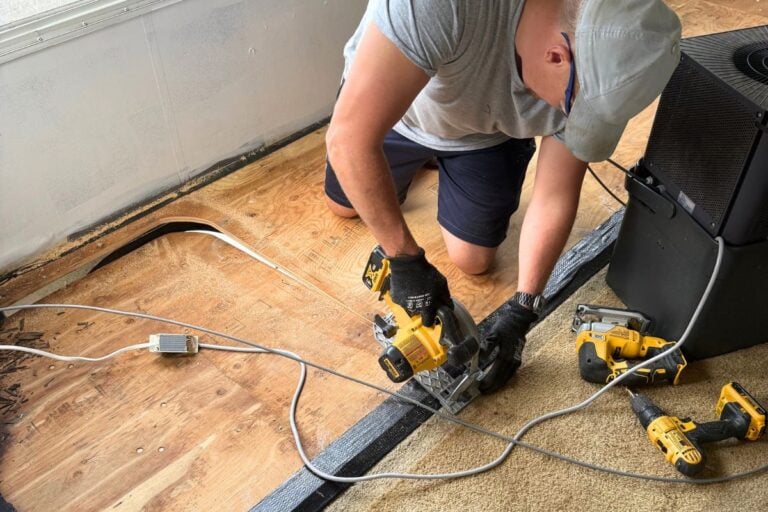
Step Four: Remove the Roof Decking (As Needed)
This is where things got real. There were six 4’x8′ boards running across the length of the camper roof. Daniel removed the entire section of the OSB/wood decking if any part of it was soft or damaged.
In some areas, that meant large sections of the roof were completely opened up.
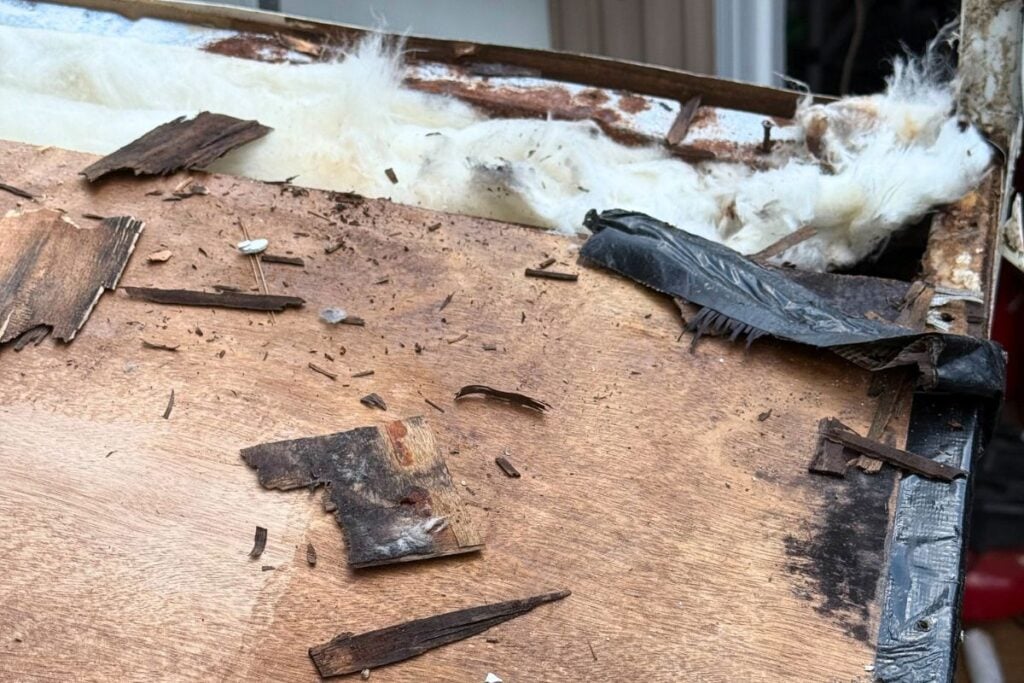

All in all, Daniel replaced four of the 4’x8 OSB boards- we were only able to salvage 2.

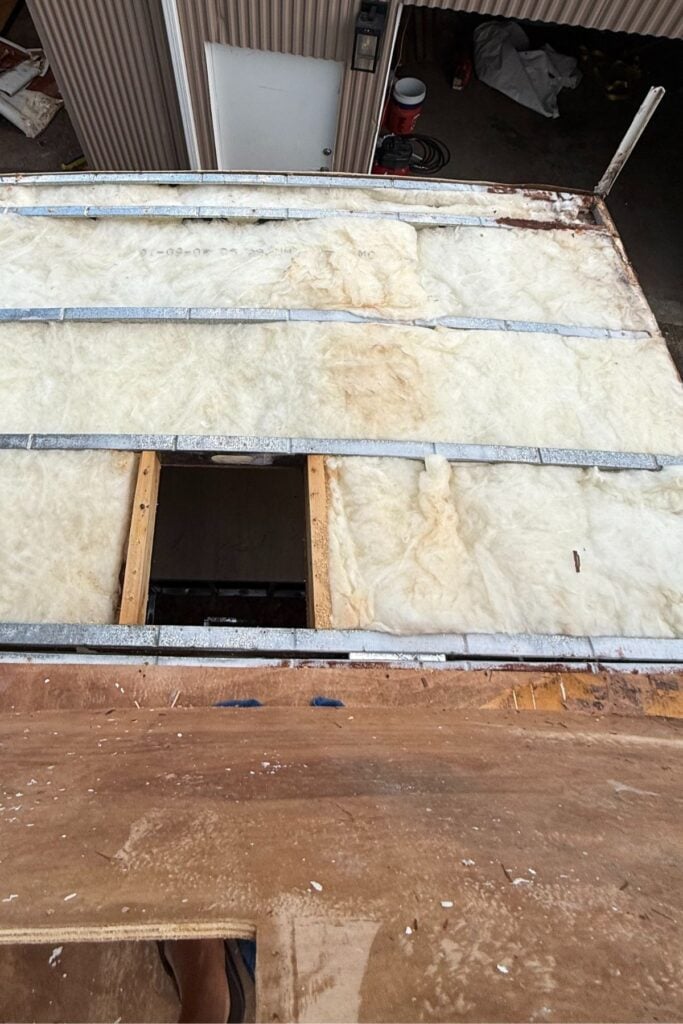
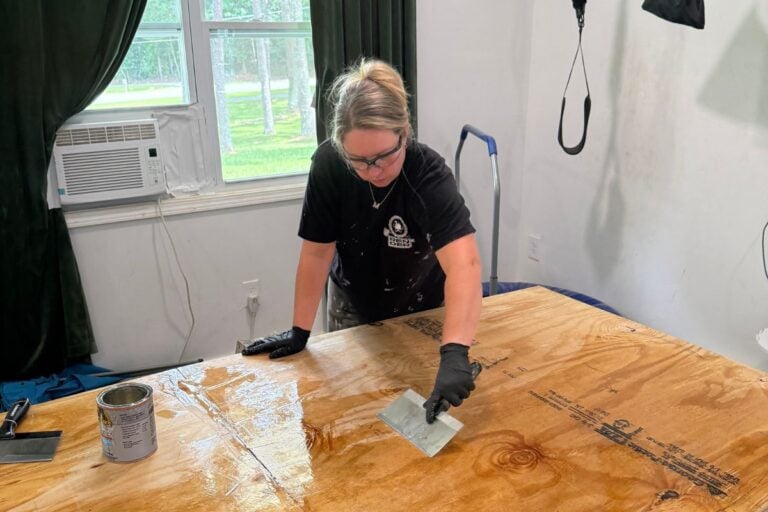
Step Five: Rebuild the Roof Structure
This was the actual repair part of the project:
- Rebuilding and repairing wood supports
- Replacing damaged framing
- Adding insulation
- Installing new OSB/decking boards
Daniel replaced and repaired anywhere that there was damaged, rotten, or moldy framing. The worst of it was the front section where the most water damage was.
Daniel rebuilt most of the structure here, added extra supports, construction foam, and extra insulation.


This step alone made the entire project worth it. The roof went from feeling like a trampoline to solid again.
We also added EternaBond Roof Seal Repair Tape on each of the seams to make sure the screws couldn’t pop up and pierce the membrane over time.

Step Six: Install the New Roofing Material
This step deserves its own emotional support section.
An important note about the roof membrane material: We originally purchased an EPDM roof replacement kit from Camping World for around $1,600.
We chose this option because multiple professionals recommended using a roofing membrane that comes rolled, not folded, since creases from folding can be difficult to remove once installed. Also, our original roof membrane was EPDM.
Unfortunately, the kit never arrived. After multiple calls and a lot of vague answers about when it might be in stock, our project kept getting delayed.
Eventually, we cancelled the order altogether and ordered this RecPro PVC roofing membrane from Amazon instead — the folded one, which to our knowledge was the only option.
As soon as it arrived (in just two days), we immediately unfolded it and rolled the membrane onto a large round PVC pipe. Doing this helped relax the folds significantly, and in the end, the creases weren’t an issue for us at all.


We laid the new roofing material out on the roof first to make sure it fit correctly. Then:
- Rolled back one half of the material
- Applied camper roofing glue
- Slowly rolled the roofing back into place
- Used a dry paint roller and smoothing tools to remove air bubbles
- Repeated on the other side
All while trying not to step on wet glue or permanently bond ourselves to the roof.

This step was easily the most tedious and the trickiest. We had to work quickly so the adhesive didn’t set before we could make adjustments, but also move carefully to avoid slipping off the camper, stepping in glue (which still happened), or ending up with bubbles and wrinkles in the material.

We didn’t immediately cut out the openings for the air vents or skylight, but we did need to cut around the stove vents and sewer vent as we went.
We used two gallons of the RecPro roof adhesive.


Step Seven: Reinstall Everything
After the glue cured, we reinstalled:
- New vents
- The AC unit
- Trim pieces
- A brand new skylight
Before re-installing, we removed the old caulk off of the camper trim pieces- actually we had our kids tackle this part.

We also cut the roofing material over the vent and skylight/AC openings by making an “X” with a razor blade, then folding the material back and stapling it to the sides of each opening where the vent would be installed.

We used Butyl tape under the vents, trim pieces, which is somewhat stretchy and sticky on both sides.
We used a couple different types of Butyl tape- our favorite was the RecPro kind that came with the kit. Unfortunately, they didn’t send us enough so we had to get some at Home Depot which was really difficult to work with- don’t recommend.

Important tip:
When we removed the front trim and outer wall section of the camper, we made sure the new roofing material went under the trim piece but over the front camper wall.
This way, rain and moisture shed over the wall instead of running into it. It’s one of those details that really matters long-term.

Step Eight: Caulk Everywhere
And then caulk some more.
And then double-check it.
And then question your life choices while caulking again.

And here was our final result!

We did not get every single crease or bubble out; we aren’t professionals and never claimed to be. But, we did a pretty good job on this DIY camper project despite it being our first (and for the love of Pete please let it be the last) time!

The musty smell is (almost!) gone inside the camper and we can walk on our camper roof now and know its firm and isn’t letting in any moisture anymore.
Camper Roof Replacement Cost Breakdown
RecPro Rubber Roof kit: $682.95
Self Leveling Caulk: $200.06
Butyl Putty Tape: $38.87
3 RV Trailer Roof Vents and 1 vent with electric fan for bathroom: $277.54
RV Septic Pump Vent: $10.42
RV Skylight: $66.67
Eterna Bond Seam Tape: $67.80
Great Stuff Pro Construction Adhesive: $19.97
Insulation: $90.87
Lumber: 2”x3” $8.98
Plywood: $85.92
Misc Tools: $56.97
Screws: $52.50
Total: $1659.52
Final Thoughts (Would We Do It Again?)
No thanks.
But… we’re incredibly glad it’s done. The roof is solid, sealed, and no longer hiding terrifying surprises under a thin layer of material.
Coming up next, I’ll finally be sharing our new camper flooring install, which (thankfully) did not require standing on the sun.
Stay tuned — and if you’re in the middle of a camper remodel too, just know you’re not alone.
Camper Roof Replacement FAQ
How long does RV roof adhesive take to cure?
We used RecPro roof adhesive, which is typically dry to the touch within a few hours but needs 24–48 hours to fully cure before reinstalling vents, trim, or walking on it extensively. We waited longer than the minimum recommended time just to be safe.
Can you replace a camper roof yourself?
Technically, yes — this is a DIY-able project. That said, it’s physically demanding, time-consuming, and quite involved unless you’re a seasoned DIYer. If you’re comfortable with construction-style work and have patience (and help), it’s possible. Just don’t expect it to be quick or easy.
Do you have to replace the roof decking when replacing the membrane?
Not always, but in our case, absolutely yes. Once we removed the old membrane, we found extensive rot in the decking and framing. If there’s any softness, sagging, or water damage, the decking should be repaired or replaced before installing a new roof membrane.
Is a rolled roof membrane better than a folded one?
Rolled membranes are generally preferred because folds can leave creases that are harder to remove. That said, we used a folded membrane, immediately unrolled it, and relaxed the creases by laying it in the sun and rolling it onto a PVC pipe — and it worked just fine for us.
How long did this camper roof replacement take?
From start to finish, the project stretched over several weeks due to material delays and cure times. Actual hands-on roof work was about 6 full days.
Pin This For Later!

The “Child labor” caption got me 😂
What a project! Gotta feel good though that the RV is safe and dry for the winter.
Haha thanks Jamon!