Simple DIY Staircase Makeover
This staircase makeover is another of those projects that I put off for a long time and now regret not doing sooner!
It was a fairly simple DIY project (if you don’t count the headache of kids suddenly having a burning desire to go up and down the stairs every two minutes!) and made a really big difference.
This post may contain affiliate links. See our affiliate disclosure here.
We live in a tri-level home, so these steps are shorter than most, as they go from the middle (main) level to the upper level. There is another set of stairs that go down to the basement.
For now, I’m leaving those as-is. They are covered in carpet and I actually don’t mind them. You can see those stairs in our basement makeover post.
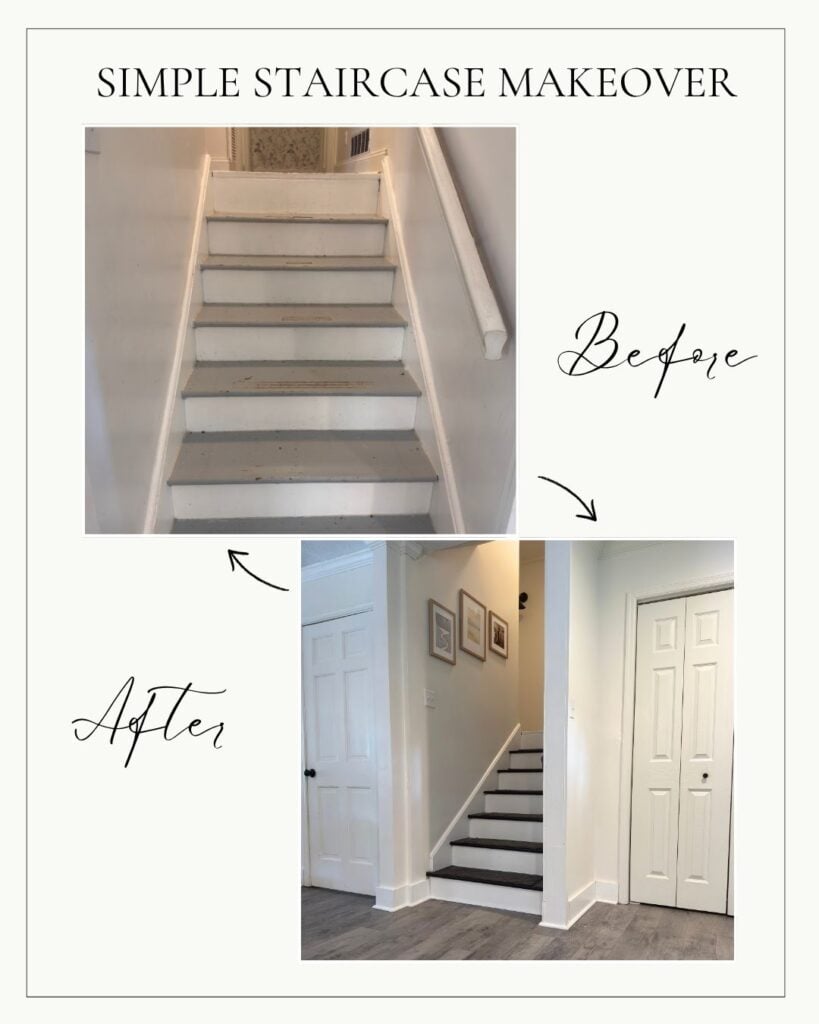
Here are some before photos of the staircase makeover:


How To DIY A Staircase Makeover
Here’s a step-by-step tutorial to paint your stair treads for a durable, professional-looking finish.
This method is ideal for indoor stairs, but you can absolutely paint an outdoor staircase too!
Materials You’ll Need:

- Painter’s tape
- Drop cloth or plastic sheeting
- Orbital sander or sanding block (120-150 grit)
- Vacuum or tack cloth
- Degreaser or TSP substitute
- Paintbrush + small roller (foam or microfiber)
- High-quality floor or porch paint (I used Behr Porch and Patio)
- Optional: bonding primer (if changing paint type or color drastically)
- Optional: Polyurethane (water-based, non-yellowing, if desired for extra protection)
Step 1: Prep the Area

Protect Surroundings
Lay down a drop cloth around your stairs.
Clean the Treads Thoroughly
Use a degreaser (I used Goo Gone Heavy Duty Cleaner and Degreaser) or TSP substitute to remove dirt, oil, and grime from each tread.
Rinse with water and let dry completely.
Step 2: Scuff Sand the Surface

Sand the Painted Treads
Use an orbital sander or sanding block with 120–150 grit sandpaper. You don’t need to strip the old paint—just rough up the surface so the new paint can grip well.
I’ve used this orbital sander from Amazon on many projects for the last three years and it has never let me down!
Vacuum & Wipe Down
Vacuum all dust, then wipe the treads with a tack cloth or damp microfiber rag to remove any remaining residue.
Now is a good time to tape off stair risers, trim, and walls with painter’s tape. I skipped this step at first, and that was actually pretty dumb!
I usually am great at cutting in and will avoid taping at all costs. I don’t know if I was just having a bad day or if its trickier with stairs, but I made a lot of mistakes and had to go back over with the white paint afterwards to get straighter lines.
I finally did tape off once I got to the end of the project and it was much easier and looked a lot better.
So, definitely at least consider taking the 2 minutes to tape where the edge of the tread meets the stair riser.
OPTIONAL: Step 3: Prime
I did not need to do this step, as I was going from a lighter latex paint to a darker latex paint, and knew it would bond well.
If your existing paint is glossy, or you’re switching from oil to latex (or vice versa), use a bonding primer.
Apply a thin coat with a brush or roller.
Let dry according to product instructions (usually 4–6 hours).
Step 4: Apply Paint

Choose the Right Paint
Use a durable floor, porch, or stair tread paint made to withstand foot traffic (e.g., Benjamin Moore Floor & Patio, Behr Porch & Patio Paint, etc.)
I chose to use Behr Porch and Patio Paint from Home Depot because we used it in our outdoor patio makeover and it has held up GREAT over the last year.
Paint Each Tread Carefully
Use a brush for edges and a small roller for the center of each tread.
Start at the top and work your way down.
Skip every other step if you need to maintain use of the stairs.
Our stairs are HIGH traffic- all our kids’ bedrooms and a bathroom are on this floor, so we needed to be able to get up and down the stairs throughout the day.
Also, as it turns out, our kids saw this as some kind of ninja challenge, and so there was even MORE traffic than normal.

Let Dry Completely
Most floor paints require 6–24 hours between coats. Check the label.
Apply a Second Coat
Repeat the painting process for a second (or third) coat if needed for coverage and durability.
Paint The Remaining Steps
Once the steps you’ve painted can be walked on, apply paint to the remaining steps, repeating the process of letting the paint dry between coats.

I also painted our railing with three coats of the same paint. That thing has been the bane of my existence- it gets so dirty, so quickly! I’m hoping the black will hold up better.
Step 5: Optional — Add a Top Coat

For added protection, especially on high-traffic stairs: Use a water-based polyurethane (like Varathane Crystal Clear) over the paint once fully dry.
Apply 1–2 coats with a clean brush, letting it dry fully between coats.
Step 6: Cure Time
Allow the paint to cure for at least 3–7 days before placing heavy traffic, rugs, or furniture on the stairs.
Light foot traffic is usually OK after 24–48 hours! Honestly my pre-schooler was all over the stairs just hours after each coat of paint, and it was dry to the touch. Thank goodness it had a quick dry time!
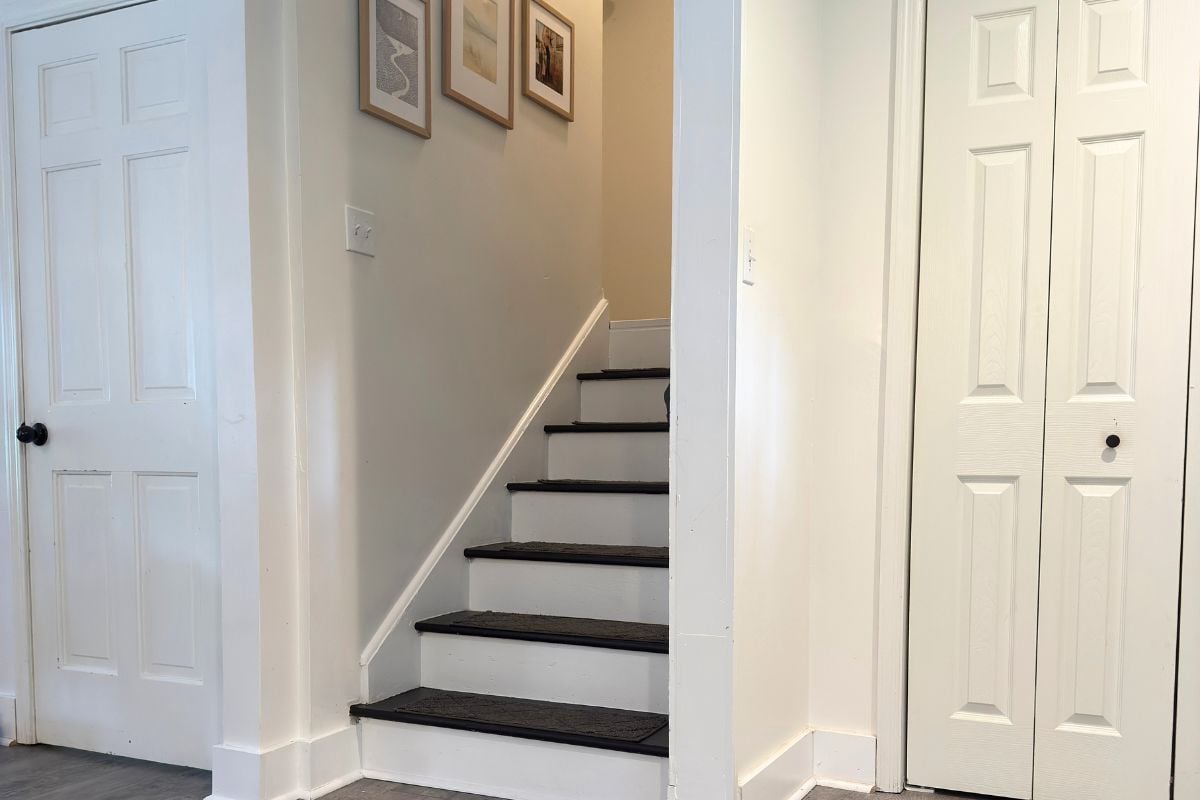
Final Updated Staircase Results

I also painted the trim around the stairs to freshen it up. It had gotten stained and dirty over time. I love the dark black against the crisp white!

Then I also added three frames to the left side wall. I got the frames from Home Goods. For now, I have these stair carpet mats on each stair tred for extra protection- with kids and pets, I want the paint to hold up as long as possible!


Extra Stair Makeover Tips:
- Use anti-slip additive in your topcoat or final paint layer for safety.
- Avoid painting in high humidity—it will prolong drying times.
- If you’re doing the entire staircase, paint every other stair, wait for them to dry completely, then do the rest.
You May Also Like:
How We Brightened Our Dark Hallway (Before and After)
14 Easy Ways To Update Your Home {2025}
Split-Level House Remodel Ideas- Befores & Afters
Pin This Staircase Makeover For Later


The DIY staircase upgrade looks great and the process is easy to follow with simple and detailed steps.
Thanks Rick!